Audio Visualization with p5.js
Using an audio file with p5
You can use an audio file inside of a p5 sketch for various uses, such as to do sound analysis (we will get to this later) and to trigger it at specified situations. In order to use audio files, we use the loadSound() function. loadSound() function should generally be saved to a variable, in which case the variable can be used to refer to the sound file inside the sketch. It should also be called inside of the preload() function, to load the audio files before running setup(). This ensures that the file is fully loaded to be playable and usable all the way through without buffering.
let sound;

function preload(){
  sound = loadSound('audio/0.mp3');
}
All af the javascript functions that you already know to control the audio file exist within the p5.sound libary as well, such as, play() and pause(), in addition to many others. Below are a selection of available functions that p5.sound library provides to control the audio file.
- play(): Plays the audio file.
- loop(): Loops the audio file.
- pause(): Pauses the audio file.
- stop(): Stops the audio file.
- isPlaying(): Returns true if audio file is currently playing.
- setVolume(vol): Sets the volume to the specified vol. Minimum of 0.0 (silence) and maximum of 1.0 (full volume).
- rate(r): Set the playback rate of audio file of specified r.
- duration(): Returns the duration of the audio file in seconds.
- currentTime(): Returns the current playback position in seconds.
- jump(time): Jumps the playback position to the specified time.
The above functions that control the audio file need to be preceded by the name of the variable that you saved the loadSound() function to, followed by a dot(.) See the example code below:
let sound;

function preload(){
  sound = loadSound('audio/0.mp3');
}

function setup() {
  sound.loop();
}
If you set the audio file to play or loop inside the setup() function, it will begin to play / loop the audio file as soon as the audio file has finished loading and is ready to play.
Below is a simple example of using mousePressed() to play() and pause() audio file, and change the background accordingly. It uses the isPlaying() function to check if the sound file is already playing. If isPlaying() is true, pause() the audio, else, play() the audio. Using the same if-else-statement structure inside the draw() function, set the background to red if it audio is playing and to blue if the audio is not playing.
let sound;

function preload() {
    sound = loadSound('audio/0.mp3');
}

function setup() {
    createCanvas(windowWidth, windowHeight);
}

function draw() {
    if (sound.isPlaying() == true) {
        background(255, 0, 0);
    } else {
        background(0, 0, 255);
    }
}

function mousePressed() {
    if (sound.isPlaying() == true) {
        sound.pause();
    } else {
        sound.play();
    }
}
Using microphone input
You can access the microphone of your computer within the p5 sketch using the p5.sound library. The p5.sound library provides p5.AudioIn object that you can use to access and start using the microphone input. See code below:
let mic;

function setup() {
  createCanvas(400, 400);

  //create & start an audio input
  mic = new p5.AudioIn();
  mic.start();
}
In the setup() function, we create a new p5.AudioIn object to access the microphone, and we start receiving the microphone input with the start() function.
You can also use the getLevel() function with the p5.AudioIn object, to get the amplitude (volume) of the microphone input. The getLevel() function will return a number between 0 (silence) and 1 (maximum volume microphone can detect). Below example uses the amplitude of the microphone input to change the width and height of the ellipse.
let mic;

function setup() {
  createCanvas(windowWidth, windowHeight);

  //create & start an audio input
  mic = new p5.AudioIn();
  mic.start();
}

function draw() {
  background(220);

  //get the level of amplitude of the mic
  let level = mic.getLevel();

  //draw ellipse in the middle of canvas
  //use value of level for the width and height of ellipse
  ellipse(width / 2, height / 2, level * width / 2, level * width / 2);
}
Drawing with Microphone Amplitude
let mic;
let amp;

let x = 0;
let y = 50;

function setup() {
  createCanvas(windowWidth, windowHeight);

  //create & start an audio input
  mic = new p5.AudioIn();
  mic.start();

  //create an amplitude object that will use mic as input
  amp = new p5.Amplitude();
  amp.setInput(mic);

  background(0);
}

function draw() {
  //get the level of amplitude of the mic
  let level = amp.getLevel();

  stroke(255, 50);
  fill(255, 10);
  //draw ellipse in the middle of canvas
  //use value of level for the width and height of ellipse
  ellipse(x, y, level * width / 2, level * width / 2);

  x += 2;

  if(x > width){
    x = 0;
    y += 50;
  }

  if(y > height){
    y = 0;
  }
}
Using p5.sound library for sound analysis
p5.sound library provides many functions we can use to analyse and get data of an audio file or of microphone input.
Amplitude:
You can easily get the current amplitude of an audio file that is being played inside the p5 sketch using the p5.Amplitude object. The p5.Amplitude object keeps track of the volume of a sound, and we can get this number, that ranges between 0 and 1, using the getLevel() function. As we have seen before, for getting amplitude of the microphone input, the getLevel() function can be used directly with the p5.AudioIn object.
var amp;

function setup() {
  amp = new p5.Amplitude();
}

function draw() {
  var level = amp.getLevel();
}
When the getLevel() function is called inside the draw() function, it returns the volume of a sound at the given time of each frame. Below example uses the level variable to manipulate the width and height of an ellipse.
let sound;
let amp;

function preload() {
    sound = loadSound('../audio/0.mp3');
}
function setup() {
    createCanvas(windowWidth, windowHeight);

    amp = new p5.Amplitude();
    noStroke();
}

function draw() {
    if (sound.isPlaying() == true) {
        background(0, 30);
    } else {
        background(255);
    }

    let level = amp.getLevel();
    ellipse(width / 2, height / 2, level * 500, level * 500);
}

function mousePressed() {
    if (sound.isPlaying() == true) {
        sound.pause();
    } else {
        sound.play();
    }
}
FFT:
FFT (Fast Fourier Transform) is an analysis algorithm that isolates individual audio frequencies within a waveform. The p5.FFT object can return two types of data in arrays via two different functions: waveform() and analyze()
- waveform(): Returns an array of amplitude values (between -1.0 and 1.0) along the time domain (a sample of time)
- analyze(): Returns an array of amplitude values (between 0 and 255) across the frequency spectrum.
Same as it was for p5.Amplitude, p5.FFT object can be created in setup() function, then used inside of draw() to continuously update the data to reflect the audio of the given frame.
let fft;

function setup() {
  fft = new p5.FFT();
}

function draw() {
  let waveform = fft.waveform();
  let spectrum = fft.analyze();
}
Below example code draws out waveforms using the waveform array. map() functions are used to translate a number of one range to another.
let mic;
let fft;

function setup() {
  createCanvas(windowWidth, windowHeight);

  mic = new p5.AudioIn();
  mic.start();

  fft = new p5.FFT();
  fft.setInput(mic);

  noStroke();
}

function draw() {
  background(0, 15);

  let waveform = fft.waveform();

  fill(255);
  for (let i = 0; i < waveform.length; i++) {
    let x = map(i, 0, waveform.length, 0, width);
    let y = map(waveform[i], -1, 1, 0, height);

    ellipse(x, y, 5, 5);
  }
}
Below example code draws out a frequency spectrum using the spectrum array. map() functions are used here again to translate a number of one range to another.
let mic;
let fft;

function setup() {
  createCanvas(windowWidth, windowHeight);

  mic = new p5.AudioIn();
  mic.start();

  fft = new p5.FFT();
  fft.setInput(mic);

  noStroke();
}

function draw() {
  background(0, 15);

  let spectrum = fft.analyze();

  fill(255);
  for (let i = 0; i < spectrum.length; i++) {
    let x = map(i, 0, spectrum.length, 0, width);
    let y = map(spectrum[i], 0, 255, height, 0);

    ellipse(x, y, 5, 5);
  }
}
Drawing with Waveform
let mic;
let fft;

function setup() {
  createCanvas(windowWidth, windowHeight);

  mic = new p5.AudioIn();
  mic.start();

  fft = new p5.FFT();
  fft.setInput(mic);

  colorMode(HSB, 360, 100, 100, 100);
}

function draw() {
  background(0, 15);

  let waveform = fft.waveform();

  translate(width / 2, height / 2);
  rotate(frameCount * 0.01);
  for (let i = 0; i < waveform.length; i++) {
    push();
    rotate(radians(i));
    let maxHeight = map(i, 0, waveform.length, 10, width / 2);
    let y = map(waveform[i], -1, 1, 0, maxHeight);

    stroke(0, 0, 100, 10);
    line(0, 0, 0, y);

    let h = map(waveform[i], -1, 1, 0, 360, 20);
    noStroke();
    fill(int(h), 100, 100);
    ellipse(0, y, 5, 5);
    pop();
  }
}
Drawing with Spectrums
let mic;
let fft;

function setup() {
  createCanvas(windowWidth, windowHeight);

  mic = new p5.AudioIn();
  mic.start();

  fft = new p5.FFT();
  fft.setInput(mic);

  colorMode(HSB, 360, 100, 100, 100);
}

function draw() {

  let spectrum = fft.analyze();

  translate(width / 2, height / 2);
  rotate(frameCount * 0.01);

  for (let i = 0; i < spectrum.length; i++) {
    if(spectrum[i] > 10){
      let y = map(spectrum[i], 0, 255, 0, width / 2);
      let h = map(i, 0, spectrum.length, 0, 360);
      let alpha = map(spectrum[i], 0, 255, 0, 15);

      strokeWeight(0.1);
      stroke(h, 80, 80, alpha);
      line(0, 0, 0, y);
      noStroke();
      fill(h, 80, 100, 5);
      ellipse(0, y, 5, 5);
    }
  }
}
Combining Amplitude, Waveform and Spectrum
let mic;
let fft;

let spectrumX = 0;
let spectrumY = 0;

let spectrumSpeed = 2;

let skyLayer;

function setup() {
  createCanvas(windowWidth, windowHeight);

  mic = new p5.AudioIn();
  mic.start();

  fft = new p5.FFT();
  fft.setInput(mic);

  skyLayer = createGraphics(width, height);

  skyLayer.colorMode(HSB, 360, 100, 100, 100);
  colorMode(HSB, 360, 100, 100, 100);
}

function draw() {
  background(0, 0, 0, 15);

  let waveform = fft.waveform();
  let spectrum = fft.analyze();

  spectrumX += spectrumSpeed;
  spectrumY = noise(frameCount * 0.001) * height / 2;

  if(spectrumX > width || spectrumX < 0){
    spectrumSpeed *= -1;
  }

  for(let i = 0; i < spectrum.length; i++){

    let spectrumHeight = map(spectrum[i], 0, 255, 0, height / 2);

    let h = map(spectrum[i], 0, 255, 0, 360);
    skyLayer.strokeWeight(0.1);
    skyLayer.stroke(int(h), 100, 100, 5);
    skyLayer.line(spectrumX, spectrumY, spectrumX, spectrumY - spectrumHeight);
  }

  image(skyLayer, 0, 0);

  for (let i = 0; i < waveform.length; i += 10) {

    let x = map(i, 0, waveform.length, -25, width + 25);
    let y = map(waveform[i] * 2, -1, 1, height / 4 * 3, height / 2);

    let h = map(waveform[i], -1, 1, 150, 290);
    noStroke();
    fill(int(h), 100, 100, 10);
    rect(x, y, 50, height / 2, 20);
  }

  console.log(mic.getLevel());

  if(mic.getLevel() > 0.02){

    for(let i = 0; i < 10; i++){
      fill(0, 0, 100, random(20, 80));
      ellipse(random(width), random(0, height / 4 * 3), random(3, 5), random(3, 5));
    }

  }
}
Bonus: Creating Multi-Output Device Using Audio MIDI Setup & Soundflower - MAC ONLY
Using Soundflower and Audio MIDI Setup (Mac native application), you can set your sound output to two sources, rather than just one (your speakers), and feed one of the output audio channels to Soundflower, a software that lets you direct output audio channel to input audio channel. The reason why having this setup is useful is because it lets you drive your audio visualization from sound / music playing from your computer and still hear the music playing through speakers.
Follow the steps below to install Soundflower and configure audio midi setup and sound settings.
Installing Soundflower
Go to the Soundflower's github page to dowload its latest release. The first time you launch the install package, it will through some security blocks.
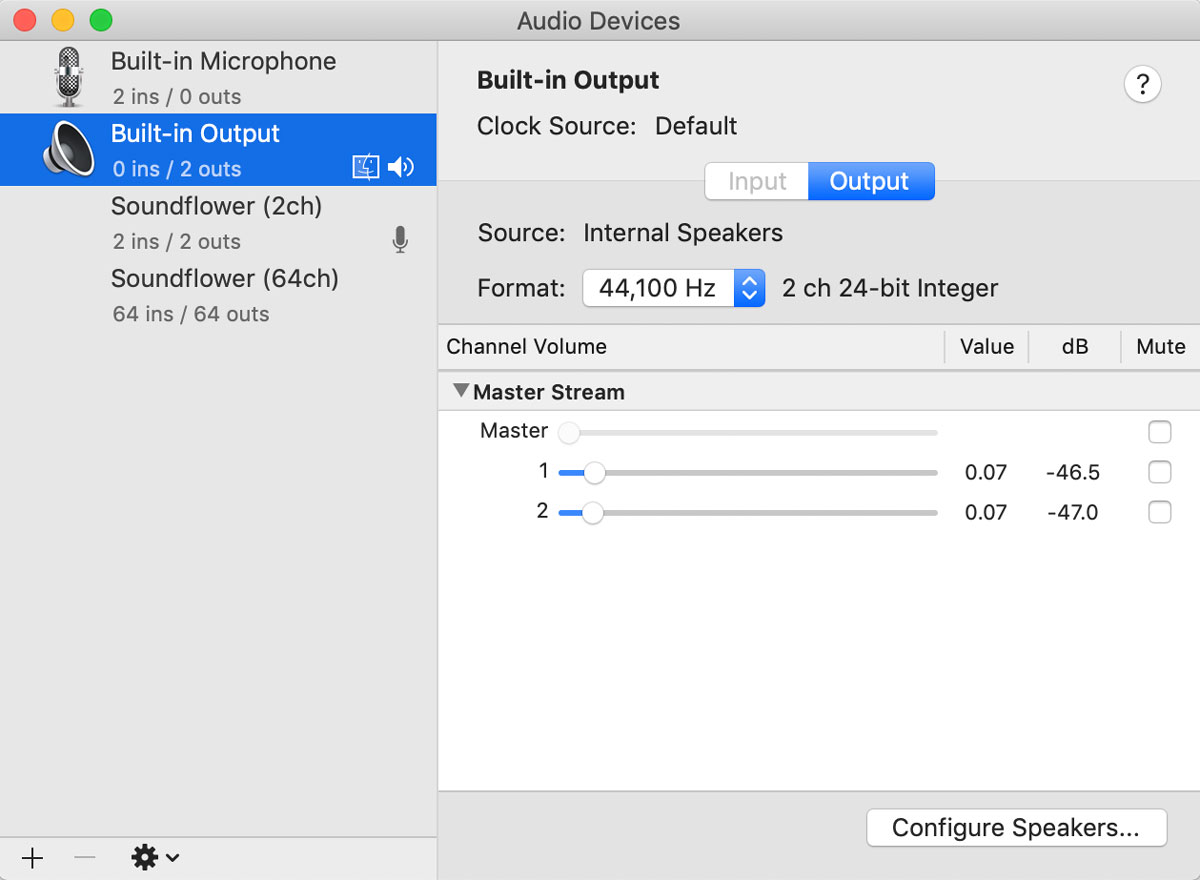
Go to Apple > System Preferences > Security & Privacy > General and click on the "Open Anyway" button. It will ask you to enter in your username and password for your computer. Once you've done that, click on the install package again to finish installing. You can check if this installation was successful by going to Apple > System Preferences > Sound and check if SoundFlower 2ch and 64ch show up in Output and Input tabs.
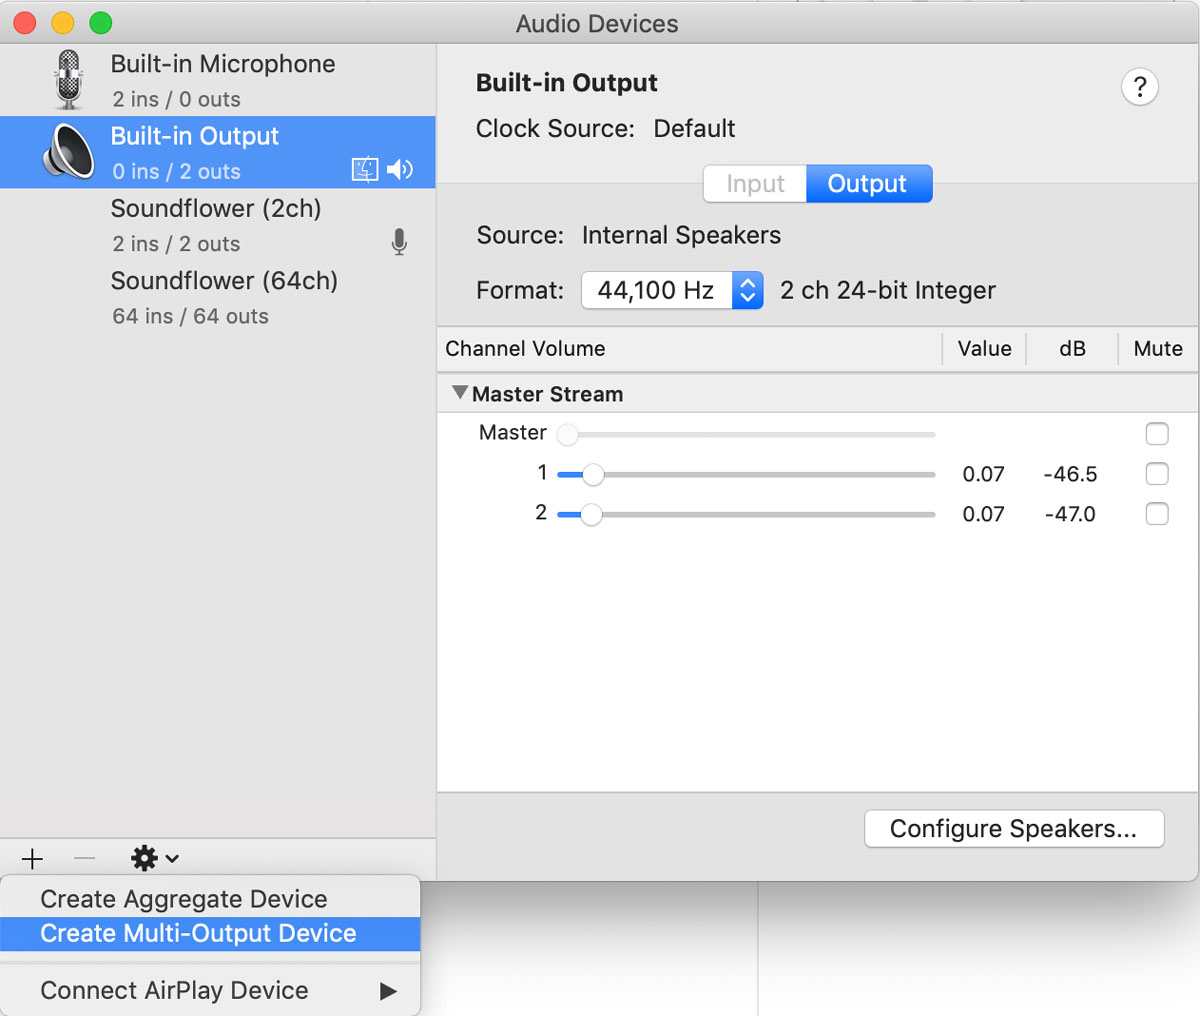
Next, we will use the Mac's native application called Audio MIDI Setup, which you can launch by searching via your spotlight. Click on the little + (plus) button in the bottomw left corner of the window, and select "Create Multi-Ouput Device".
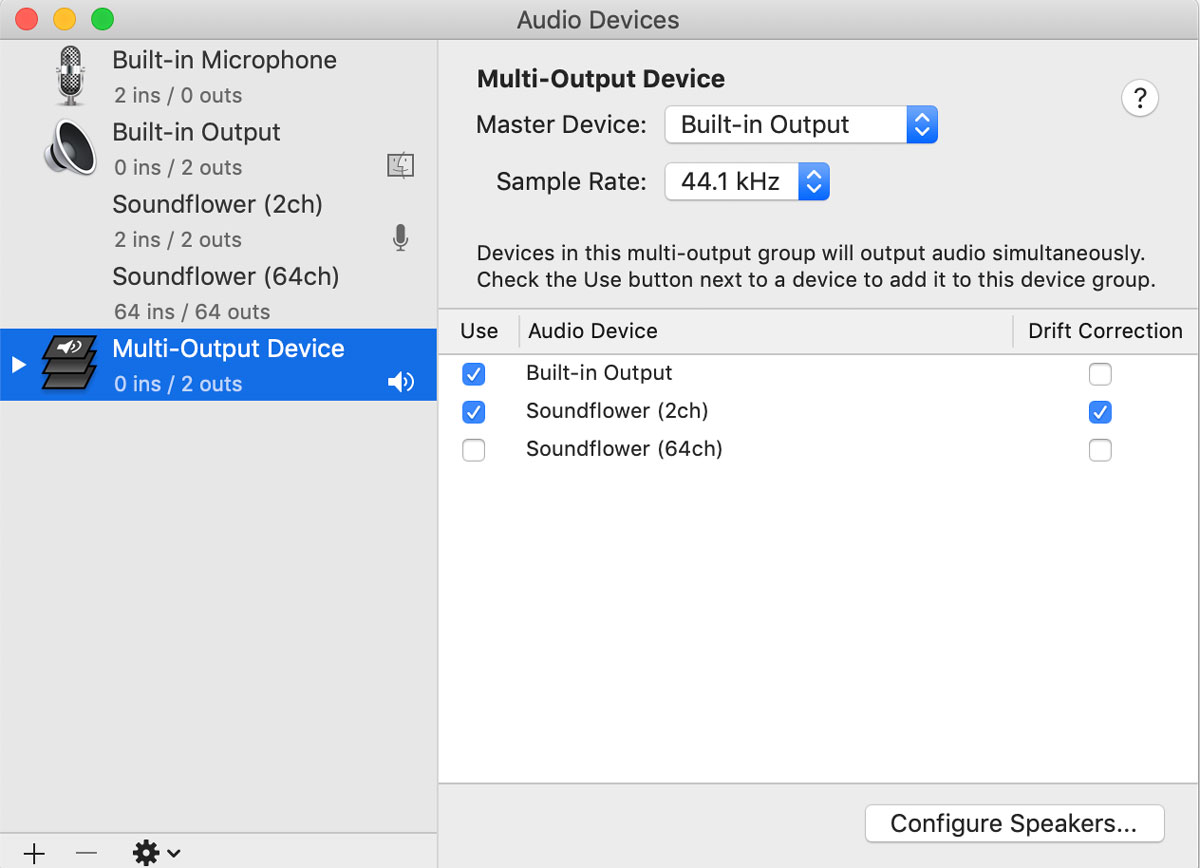
It should create you a new tab for the newly created Multi-Output Device, and check "Soundflower (2ch)" option.
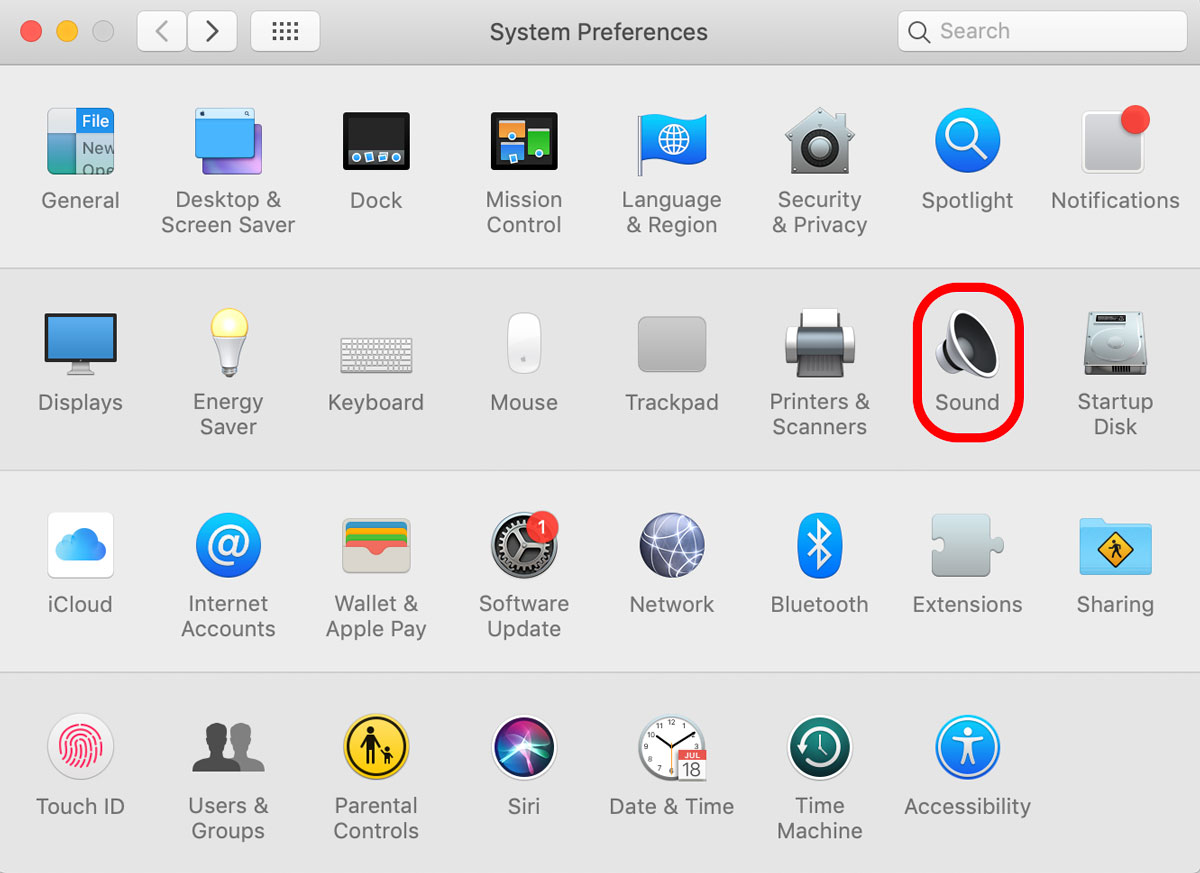
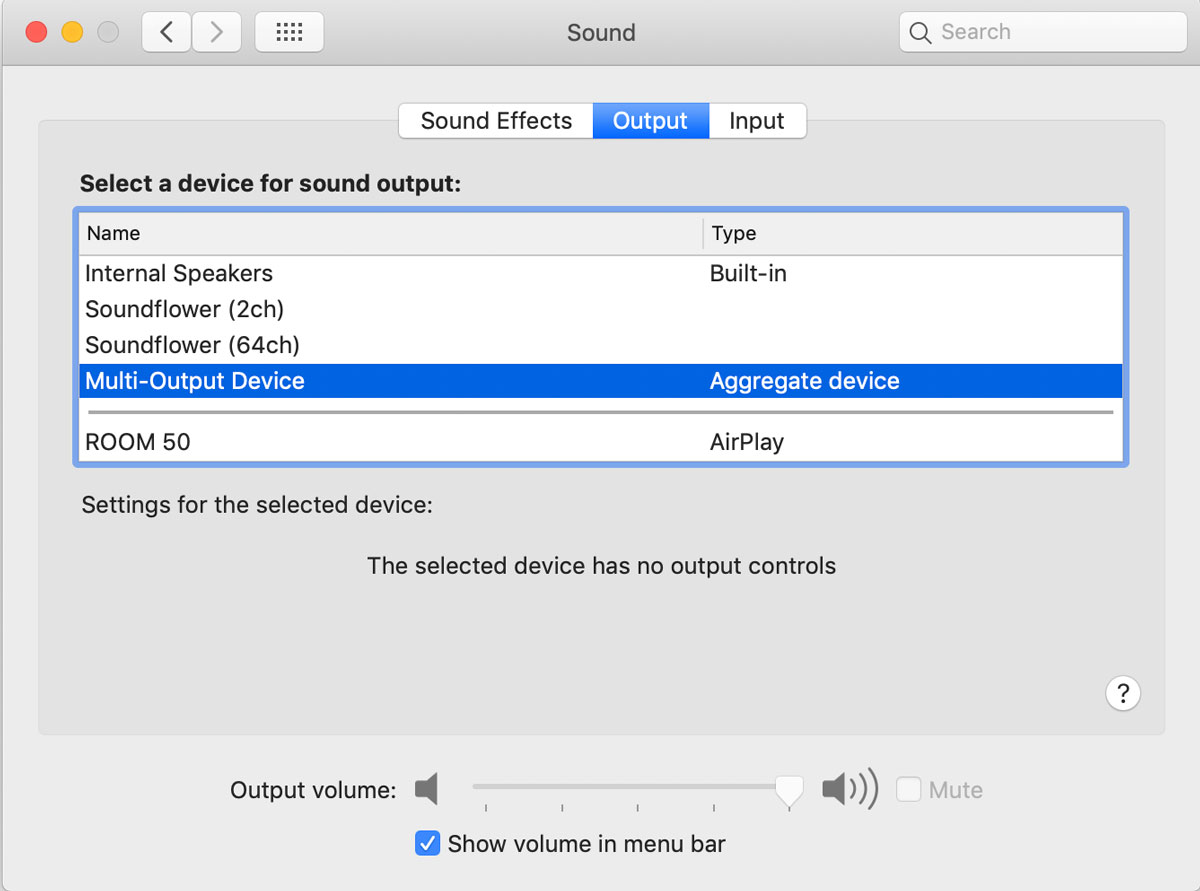
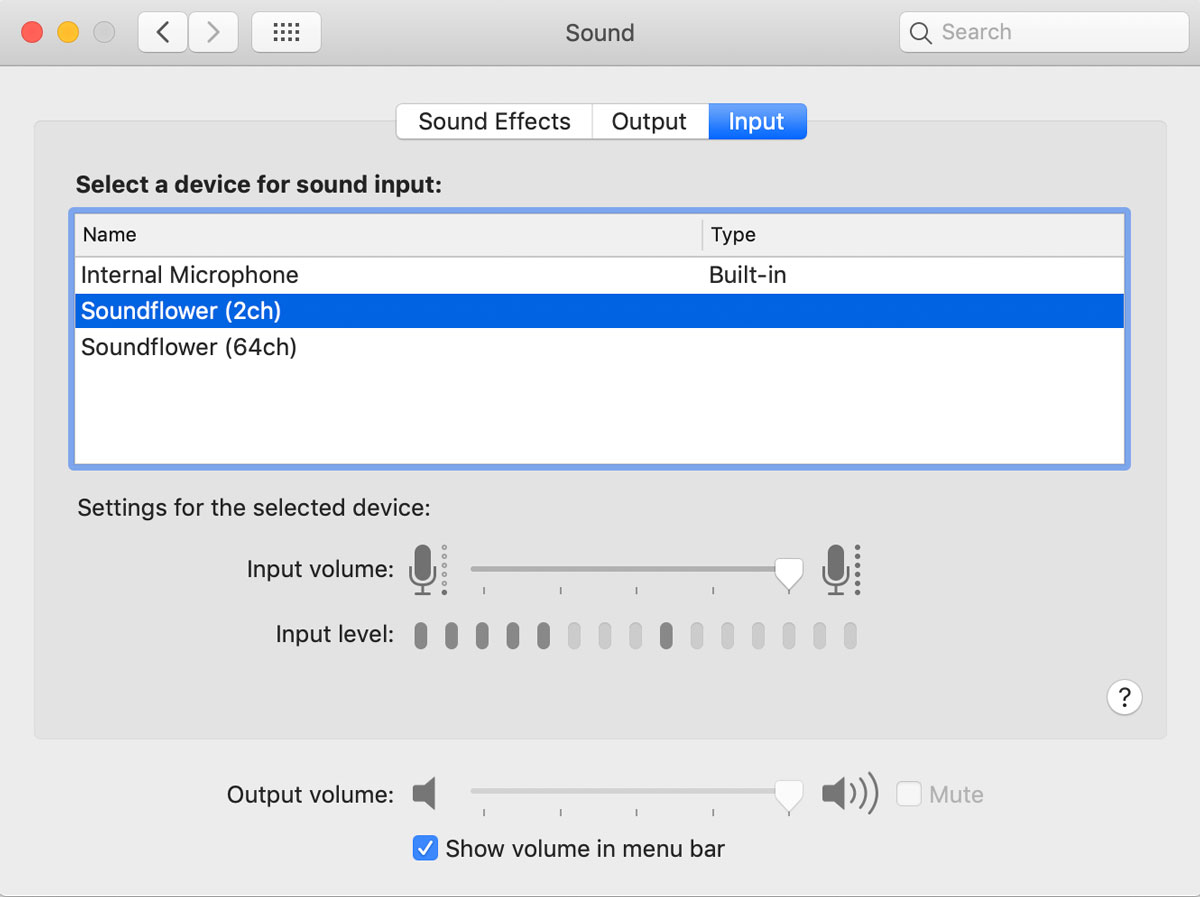
Lastly, go to Apple > System Preferences > Sound and set your Output to Multi-Ouput Device and Input to "Soundflower (2ch)".
One thing to note: You now can't control volume via the sound icon on the top right corner of your computer (or through your touchbar). You have to control your volume via the Audio MIDI setup control window.