Foundations of Web Development
General
File Organization
A website generally will contain similar file types. This means that you can decide on a structure for websites and keep it that way. Once you get used to how to structure your files for the web, giving file paths for your images, videos, audios, stylesheets, etc., will no longer be confusing. In the image above, within the folder of my website "assignment1", I have three major folders: assets, css, and js. The two folders, css and js, are pretty self-explanatory. They contain css stylesheets and javascript files, respectively.

The assets folder contains all of my media assets. Inside, it has three other folders: audio, img and video. This way, I can upload my media assets into their categories and keep them organized.
Please keep in mind that this isn't the only way that you can structure your folders and files. What is important is that you try to keep a uniform format that you are comfortable with and repeatedly use.
Including External Files to HTML: CSS and Javascript
Generally, CSS stylesheets are added between the <head> tags and Javscript files are added AFTER the closing </body> tag.
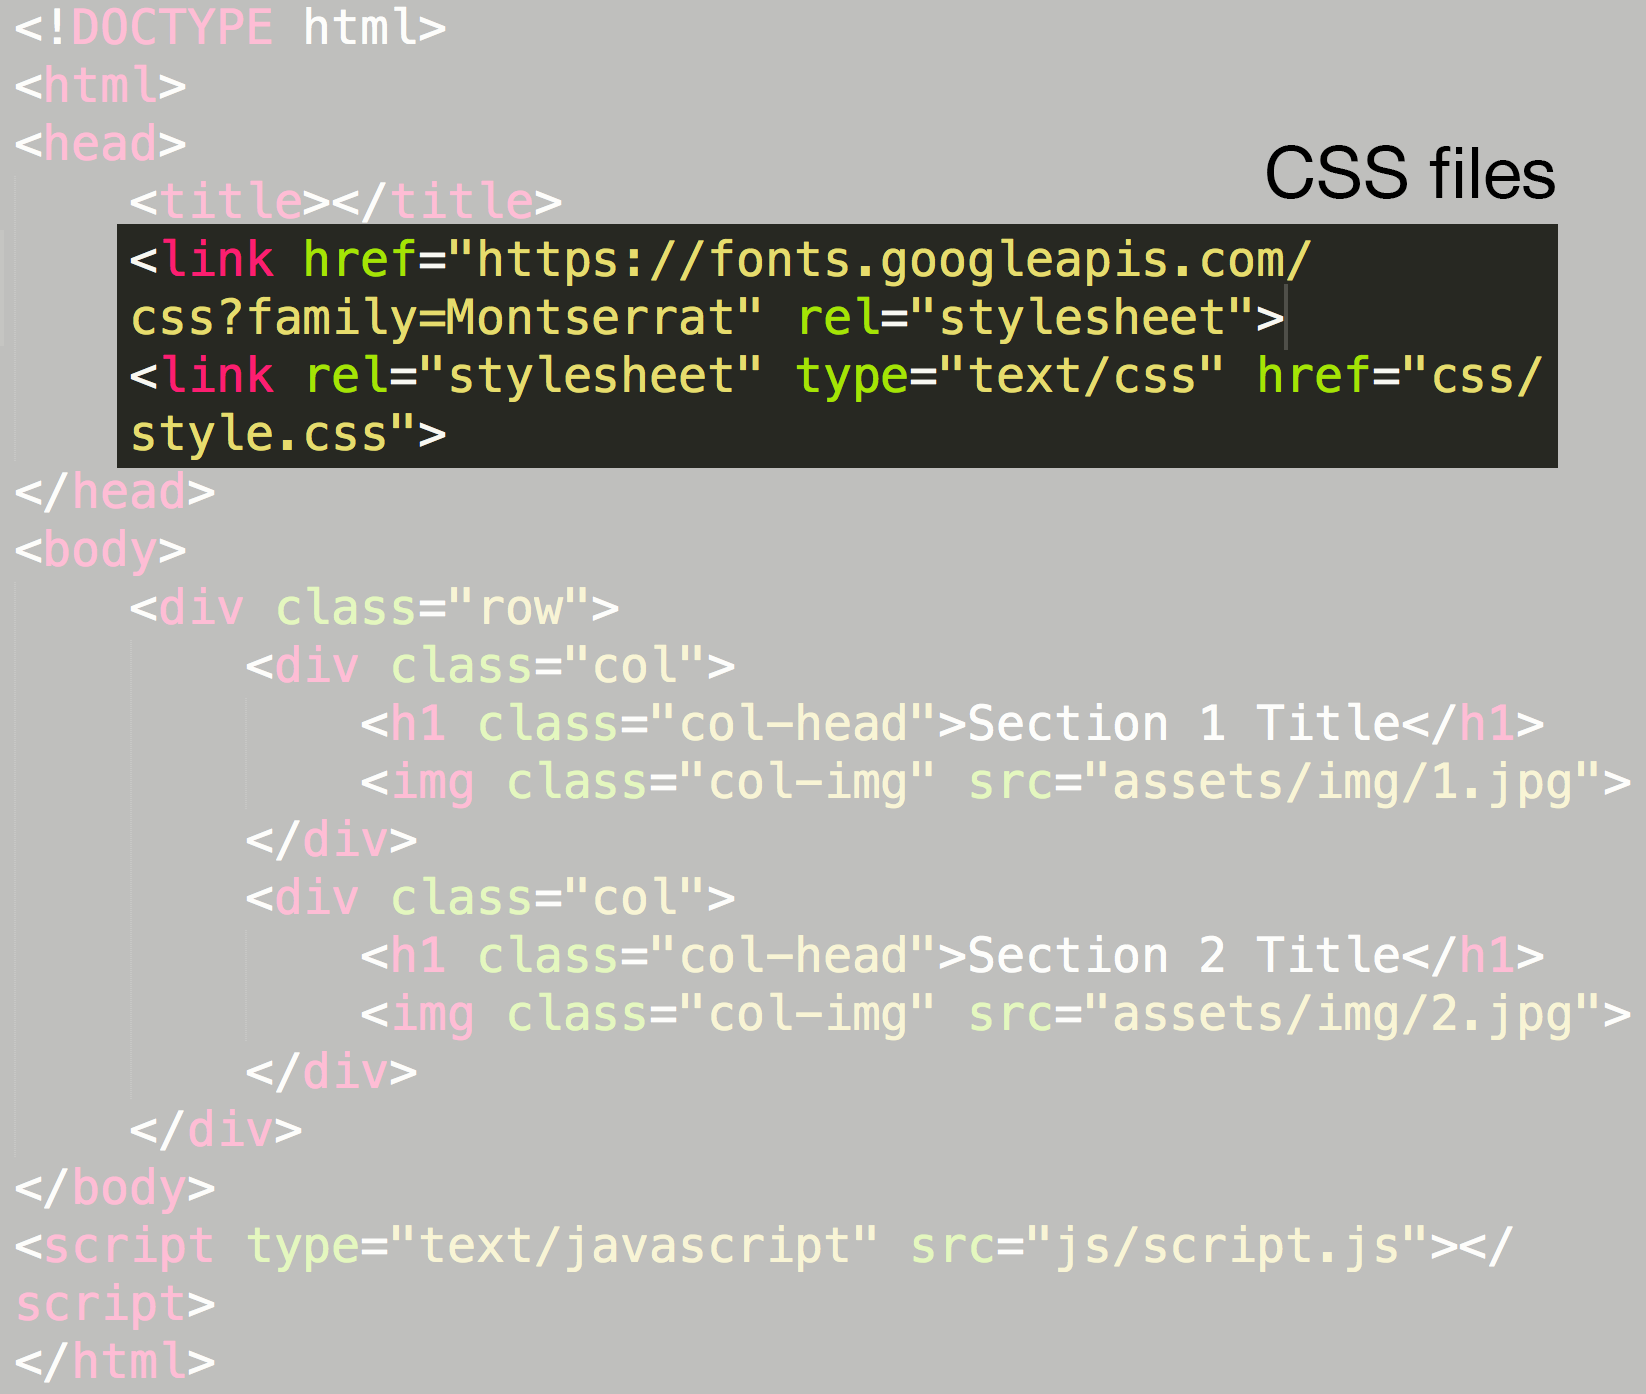

Reason for this is that CSS styles needs to be loaded before HTML to apply the styles as the HTML elements are loaded, and Javascript files need the HTML elements inside <body> to load beforehand, because they usually contain code that use and manipulate the HTML elements.
Assuming that you are following the layout of the folder structure as described in the previous section, if we need to access image files from the css stylesheet, we would need to set the path to the file like below:
background-image: url("../assets/img/imgName.jpg");
The ../ is a way of indicating to move out of the current folder. In this case, since the style.css file is inside css folder, it will move one folder out into the root folder of the project, where index.html is located, then go into the assets folder then img folder to locate a file called imgName.jpg
Indentation
Although indentation has no effect in the actual result of the website, it is important to keep a practice of neatly indenting your code for your own good. As the code gets more complex and long, it will help you reduce errors as well as visually see where a single line of code fits into forming the structure / logic of the web page.
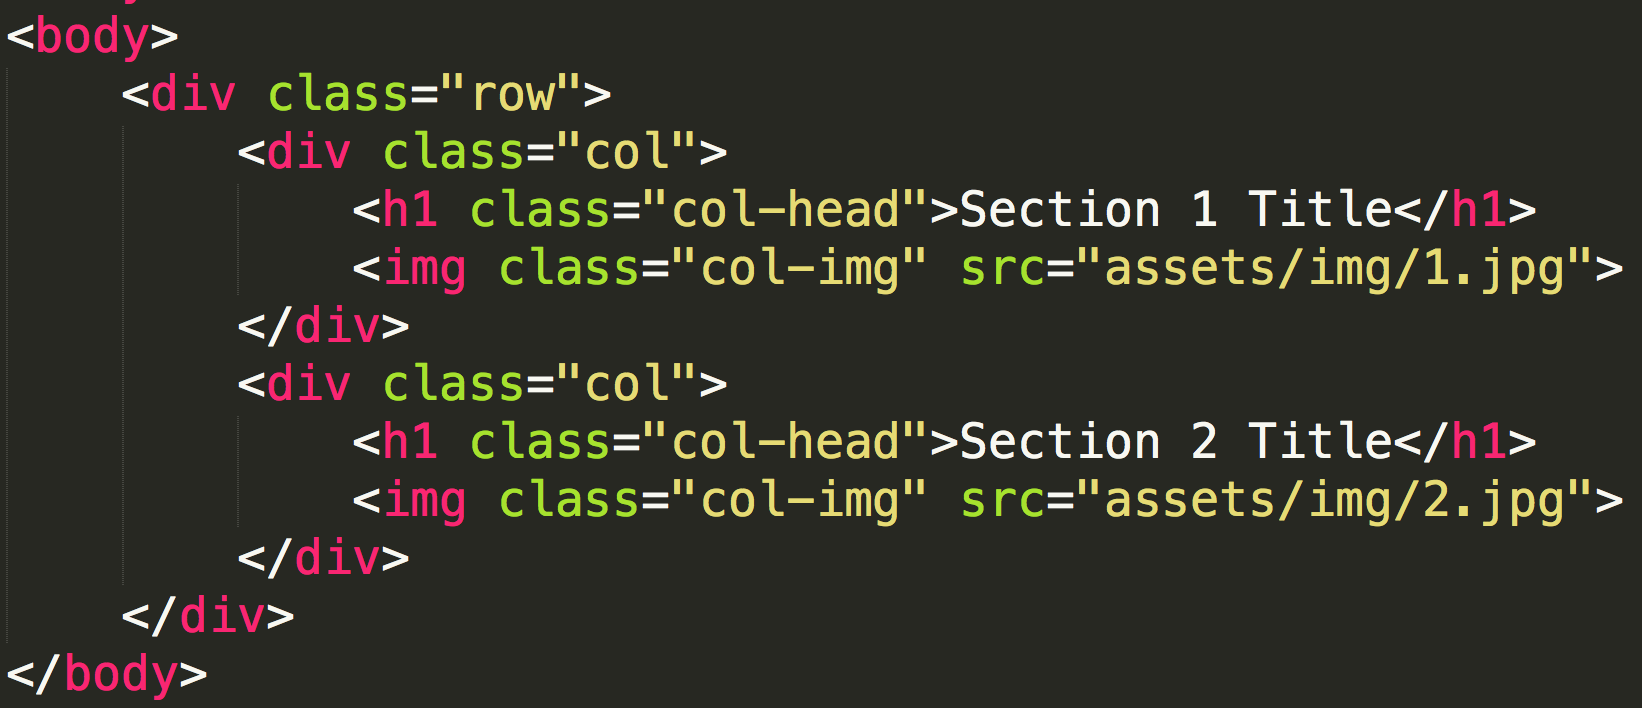
Above image is an example of proper indentation for HTML pages. In HTML, another added reason for good indentation will be that CSS styles are inherited by the elements that are surrounding an html element. For example, if using percentage as unit of the size of .col-img <img> tags, it will depend on what the defined sizes are for the .col and .row <div> elements.

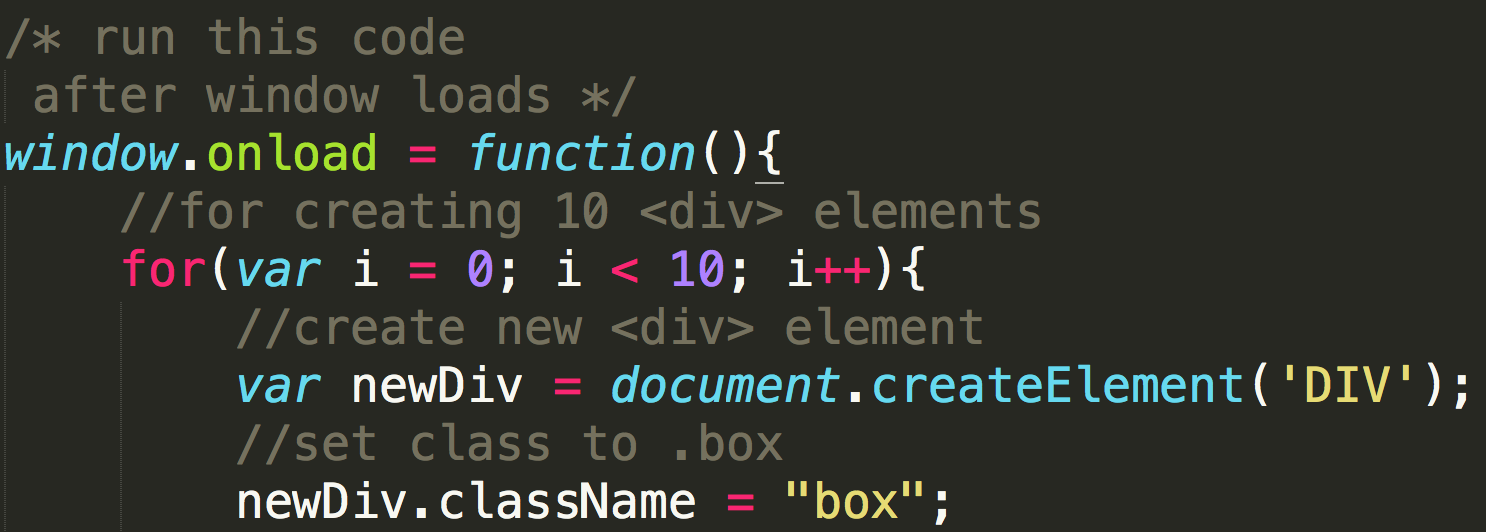
In javascript, indentation becomes especially helpful when using multiple loops and if-statements. It will help you see what sections of code are inside an if-statement or a loop as well as help you see you have the correct number of brackets.
Comments
In any programming language, you can comment on the source code, meaning that you can make annotations for you and your collaborators. Generally, it is a good practice to make comments that briefly describe what different parts of the code do. You can also make comment out sections of code that you want to keep as reference but no longer want. If you are a complex function, commenting is a good way to make note of the syntax for future reference. Comments will not be executed and will be ignored by the web browser. Future you will appreciate the comments you make today!
Comments can be written followed by a group of characters that differ from a programming language to another.
HTML:
<!-- This is a comment in html -->

CSS:
/* This is a comment in css */
Javascript:
// This is a one line comment in javascript

/*
This is a multi line comment
in javascript
*/
HTML
Class & Id
There are three major ways that HTML elements can be referenced in CSS and Javascript: by tag name, class and id. Tag name is the most general way of referencing HTML elements. Referencing the <p> tag will select ALL <p> tags in the HTML document. Classes can be used to select a GROUP of HTML elements, and thus one class can be given to multiple HTML elements. Ids are used to select a SINGLE HTML element, thus is given to an HTML element that you want to separate out / is an unique element on an html document. Below example will help make a more clear distinction between use of classes and ids.
HTML:
<div class="row">
    <div id="firstBox" class="col"></div>
    <div id="secondBox" class="col"></div>
</div>
<div class="row">
    <div id="thirdBox" class="col"></div>
    <div id="fourthBox" class="col"></div>
</div>
CSS:
.row{
    width: 200px;
    height: 100px;
    margin: auto;
}

.col{
    width: 50%;
    height: 100%;
    float: left;
}

#firstBox{
    background-color: red;
}

#secondBox{
    background-color: blue;
}

#thirdBox{
    background-color: green;
}

#fourthBox{
    background-color: yellow;
}
Above code is the basic HTML structure for creating a 2 by 2 grid. Within each <div> of class .row, there are two <div> of class .col - hence classes are used for applying a single set of styles for multiple elements. Here, you can see that classes should be used to elements that you want to have the same styles. Each <div> element of class .col also have a unique id that are being used to apply different background-color property. Thus, id is used to apply differentiated and unique values for an individual HTML element.
Attributes
Attributes are properties that belong to a particular HTML element. Attributes of HTML tags are written inside of the opening tag in the form of:
<p attribute="value"></p>
This should look familiar, because we've seen things like below before:
<img class="grid-img" width="100%" src="img/1.jpg">
In the above line inside the <img> tag, class, width and src are all attributes of the <img> tag. Some HTML tags have required attributes. For example, src is a required attribute for <img>. Some attributes are applicable only for certain HTML tags, again like src for <img> - because src cannot be used for a <p> element, for example. However, there are attributes that can be used for ANY HTML elements (they are called global attributes) - two of the most commonly used being class and id. There are also another type of attributes that we've seen - event attributes.
Event Attributes:
Event attributes are used to have an event trigger javascript code for a specific HTML element. There are other ways of attaching javascript code to an event (in pure javascript), but you can also simply attach a function to an HTML element using an event attribute like below:
<img onclick="changeImg()" src="img/1.jpg">
The list below includes commonly used event attributes:
- Window Events:
- onload
- onresize
- onscroll
- Mouse Events:
- onclick
- ondblclick
- onmouseover
- onmouseout
- onmousemove
- Keyboard Events:
- onkeypress
- onkeyup
- onkeydown
- Media (Audio & Video) Events:
- oncanplaythrough
- onended
- onpause
- onplay
- onratechange
- onseeking
- ontimeupdate
- onvolumechange
Non-Roman characters: Charset
To be able to display non-English / or non-roman characters on a web page, you will need to specify that the web page also uses sets of non-roman characters. This can be done by simply adding the line below within the <head> tag.
<meta charset="utf-8">
CSS
Units
px is the absolute unit of measurement, meaning that 1 px on one screen is generally the same as 1 px on aother screen. But this also means that if you set a width of an HTML element in px, no matter the size of the screen, it will always the absolute fixed size. One alternative is % (percentage).
There are actually a lot more units of measurement than just pixels and percentages you can use in css. This w3schools page shows all the existing units of measurement in css. Out of the many units of measurement, I want to emphasize just a couple: vw, vh and em.
vw and vh stands for "viewport width" and "viewport height". 1 vw is 1% of the viewport width, which means the current width of the window. This means that if the width of your window changes, the absolute size (in pixels) of 1 vw will change accordingly. Thus, 100 vw will signify the width of your browser window and 100 vh will be the height of your browser window. You can also make something 120 vw, which would be the 120% of your viewport width.
See below demo for comparison between %, vw and vh: (Click here for full page demo.)
em is a unit based on the size of the font. em means the width of your letter "m". 1 em means the width of letter "m" according to the font size you set for that particular div (or the inherited size of the font size of the div) For example, if you are sizing the width of your <h1> element using em, and if your h1 tag has font-size of 32px, 1 em = 32 px.
Positioning Elements
Centering text elements: such as <h1> and <p>
text-align: center;
Centering non-text elements: such as <div> and <img>
position: relative;
display: block;
margin: auto;
The margin: auto; line of CSS automatically adjusts the margin-left and margin-right to center the HTML element HORIZONTALLY.
Javascript
The best way to get use to Javascript is simply to play with it. Sections of the Javascript simulator are added below, but click here to see the full version.
Looking up HTML element(s)
document.getElementById('idName')
: returns a single HTML element of id "idName".
document.getElementsByClassName('className')
: returns an ARRAY of HTML elements of class "className". You can reference individual elements of the array using an ARRAY INDEX.
var boxes = document.getElementsByClassName('box');

for(var i = 0; i < boxes.length; i++){
    boxes[i].style.width = i * 50 + "px";
}
Above for-loop iterates through all elements of class "box" and sets the width of each div to be in increasing multiples of 50px.
document.getElementsByTagName('h1')
: returns an ARRAY of HTML elements of tag "h1". Same as the way for getElementsByClassName, you can access individual elements using an ARRAY INDEX.
var titles = document.getElementsByClassName('title');

for(var i = 0; i < titles.length; i++){
    titles[i].style.color = red;
}
Changing CSS with .style
You can look up the CSS styles applied to a particular HTML element as well as set them to a value of your choice. To refer to the css related to a particular HTML element, simply add .style after. If you want to look up / set a value of a particular CSS property, add another . (dot) and follow it by that CSS property. If the CSS property you want to look up / set has a - (dash) in its name, change the way it is written using camel casing. Camel casing is a way of writing compound / multiple words that usually replaces spaces, but in this cas dashs, by capitalizing the word that would usually come after the space / dash. For example, background-color can be rewritten as backgroundColor.
Javascript is fun!
HTML:
<div id="text-box">
	<p id="inner-text">Javascript is fun!</p>
</div>
CSS:
#text-box{
    background-color: black;
    color: white;
    padding: 24px;
}

#inner-text{
    font-size: 24px;
    text-align: center;
}
DEMO 1: Type Animation with Javascript
This demo focuses on the use of arrays, if-statements and setInterval function.
HTML:
<div id="typePanel"><span id="typedText"></span></div>
CSS:
#typePanel{
    width: 100%;
    height: 2em;
    text-align: center;
}

#typedText{
    font-size: 2em;
}
Javascript:
var words = ["Hello.", "Welcome.", "How are you today?"];
var currText = "";
var currWord = "";
var wordIndex = 0;
var letterIndex = 0;
var typeDirection = 0;

setInterval(function(){

    if(typeDirection == 0){
        currWord = words[wordIndex];
        currText += currWord[letterIndex];

        if(letterIndex < words[wordIndex].length - 1){
            letterIndex++;
        }else{
            typeDirection = 1;
        }
    }else{
        currText = words[wordIndex].slice(0, letterIndex);
        if(letterIndex > 0){
            letterIndex--;
        }else{
            if(wordIndex < words.length - 1){
                wordIndex++;
            }else{
                wordIndex = 0;
            }
            typeDirection = 0;
        }
    }

    document.getElementById('typedText').innerHTML = currText;

}, 200);
DEMO 2: onclick Event with variable this
This demo demonstrates the use of this variable
HTML:
<div id="box-container"></div>
CSS:
body, html{
    margin: 0;
    background-color: white;
}

.box{
    width: 10vw;
    height: 10vh;
    background-color: red;
}
Javascript:
var newDiv;
window.onload = function(){
    for(var i = 0; i < 10; i++){
        newDiv = document.createElement("DIV");
        newDiv.className = "box";
        newDiv.setAttribute("onclick", "changeBG(this)");

        newDiv.style.marginLeft = i * 10 + "vw";

        document.getElementById("box-container").appendChild(newDiv);
    }
}

function changeBG(currDiv){
    currDiv.style.backgroundColor = "blue";
}